How to set up a CI/CD pipeline from scratch (with GitHub Actions)
Learn how to set up a production-ready CI/CD pipeline from scratch with GitHub Actions — full annotated YAML for linting, testing, Docker builds, security scanning, staging deployment, and production approval gates.

Every professional engineering team automates the boring parts: running tests on every pull request, building Docker images, catching security vulnerabilities before they reach production, and deploying code without a human running commands at midnight.
GitHub Actions is how most teams do it in 2026 — and for good reason. GitHub Actions now executes over 6 million workflows every single day, up 40–55% year-over-year, serving 180+ million developers across 630 million repositories. 90% of Fortune 100 companies rely on GitHub workflows to ship software. Enterprises report a 32% average reduction in deployment cycle time after migrating from legacy CI systems to GitHub Actions.
This guide builds a complete, production-ready CI/CD pipeline from scratch — starting with zero automation and finishing with a pipeline that lints, tests, builds a Docker image, scans for security vulnerabilities, deploys to staging, and gates production releases behind a human approval step. Every YAML block is real, annotated, and ready to adapt to your stack.
No prior CI/CD experience required. If you've pushed code to GitHub, you have everything you need to start.
What is CI/CD and why does it matter?
Continuous Integration (CI) is the practice of automatically validating every code change — running linters, tests, and build checks — before it can be merged. The core idea: catch problems when they're small and cheap to fix, not after they've been deployed.
Continuous Delivery / Deployment (CD) extends CI by automatically deploying validated code to one or more environments. Continuous Delivery means code is always in a deployable state and can be released with one click or approval. Continuous Deployment goes further: every passing build automatically ships to production.
Why this matters practically:
Without CI/CD, the feedback loop on a code change looks like: write code → manually run tests → open PR → wait for review → merge → manually deploy → discover problems in production. This loop is slow, error-prone, and scales poorly as teams grow.
With CI/CD, the loop becomes: write code → push → pipeline automatically validates and deploys → problems caught in minutes, not days. Teams that ship this way deploy more frequently and break production less often — because each individual change is smaller and validated before it merges.
How GitHub Actions works: core concepts
Before writing YAML, understand the four core concepts that every GitHub Actions workflow builds on.
Workflows are the automation files. They live in .github/workflows/ in your repository as YAML files. You can have multiple workflows — one for CI, one for deployment, one for scheduled tasks.
Events are what trigger a workflow. A push to main, a pull_request opening, a schedule (cron), a manual workflow_dispatch button, or a webhook from an external tool.
Jobs are the units of work inside a workflow. By default, jobs run in parallel. You can make them sequential with needs:. Each job runs on a fresh virtual machine (runner).
Steps are the individual commands inside a job. Steps run sequentially within a job. Each step either runs a shell command (run:) or uses a pre-built Action from the marketplace (uses:).
Workflow (.github/workflows/ci.yml)
└── Triggered by: push to main, pull_request
    ├── Job: lint (runs on ubuntu-latest)
    │   ├── Step: Checkout code
    │   ├── Step: Install dependencies
    │   └── Step: Run linter
    ├── Job: test (runs in parallel with lint)
    │   ├── Step: Checkout code
    │   ├── Step: Run tests with coverage
    │   └── Step: Upload coverage report
    └── Job: deploy (runs after lint + test pass)
        ├── Step: Build Docker image
        └── Step: Deploy to staging
One file, dropped into your repository, and GitHub handles the rest — no servers to provision, no webhooks to configure manually.
Step 1: Create your first workflow file
Create the directory structure:
mkdir -p .github/workflows
touch .github/workflows/ci.yml
Start with the simplest possible workflow — something that actually runs:
# .github/workflows/ci.yml
name: CI Pipeline

on:
  push:
    branches: [main, develop]
  pull_request:
    branches: [main]

permissions:
  contents: read   # Security best practice: explicit, least-privilege permissions

jobs:
  test:
    name: Build and Test
    runs-on: ubuntu-latest
    timeout-minutes: 15  # Kill runaway jobs — don't let them eat your minutes quota

    steps:
      - name: Checkout code
        uses: actions/checkout@v4

      - name: Set up Node.js
        uses: actions/setup-node@v4
        with:
          node-version: '20'
          cache: 'npm'   # Cache node_modules between runs — saves 30-60 seconds

      - name: Install dependencies
        run: npm ci      # Always use npm ci in CI, not npm install — reproducible builds

      - name: Run linter
        run: npm run lint

      - name: Run tests
        run: npm test -- --coverage
Push this file to your repository. Go to the Actions tab in GitHub. You'll see the workflow running.
That's your first CI pipeline. Every pull request to main will now automatically run your linter and tests before a reviewer even looks at it.
Step 2: Add caching to speed up your pipeline
Slow pipelines get ignored or bypassed. Caching is the single fastest way to speed up GitHub Actions — dependency installation often accounts for 30–60% of total pipeline runtime.
      - name: Cache node_modules
        uses: actions/cache@v4
        with:
          path: ~/.npm
          key: ${{ runner.os }}-node-${{ hashFiles('**/package-lock.json') }}
          restore-keys: |
            ${{ runner.os }}-node-
The hashFiles() function creates a cache key from your lockfile. The cache invalidates whenever dependencies change but reuses across runs with identical dependencies. For most Node.js projects, this saves 45–90 seconds per run.
For other language ecosystems:
# Python (pip)
- uses: actions/cache@v4
  with:
    path: ~/.cache/pip
    key: ${{ runner.os }}-pip-${{ hashFiles('**/requirements.txt') }}

# Go modules
- uses: actions/cache@v4
  with:
    path: ~/go/pkg/mod
    key: ${{ runner.os }}-go-${{ hashFiles('**/go.sum') }}

# Java (Maven)
- uses: actions/cache@v4
  with:
    path: ~/.m2
    key: ${{ runner.os }}-maven-${{ hashFiles('**/pom.xml') }}
Step 3: Add security scanning
The most critical security practices for GitHub Actions CI/CD in 2026 include pinning all actions to a full SHA rather than a branch or mutable tag, using OIDC instead of static credentials for cloud authentication, and applying least-privilege permissions using the permissions: key at the job level.
Never use mutable tag or branch references (@v4, @main, @latest) — these are vulnerable to supply chain attacks where a compromised tag can execute malicious code in your CI/CD pipeline.
Add three layers of security scanning to your pipeline:
  security:
    name: Security Scan
    runs-on: ubuntu-latest
    needs: test   # Only runs if tests pass
    permissions:
      security-events: write  # Required for uploading SARIF results

    steps:
      - name: Checkout code
        uses: actions/checkout@v4

      # Layer 1: Scan source code for vulnerabilities (SAST)
      - name: Run CodeQL analysis
        uses: github/codeql-action/analyze@v3
        with:
          languages: javascript

      # Layer 2: Scan for leaked secrets and credentials
      - name: Scan for secrets
        uses: trufflesecurity/trufflehog@main
        with:
          extra_args: --only-verified --fail

      # Layer 3: Scan dependencies for known CVEs
      - name: Run Trivy vulnerability scanner
        uses: aquasecurity/trivy-action@master
        with:
          scan-type: fs
          scan-ref: .
          severity: CRITICAL,HIGH
          exit-code: 1         # Fail the build on CRITICAL or HIGH findings
          format: sarif
          output: trivy-results.sarif

      - name: Upload Trivy scan results to GitHub Security
        if: always()
        uses: github/codeql-action/upload-sarif@v3
        with:
          sarif_file: trivy-results.sarif
This three-layer approach catches: code-level vulnerabilities (CodeQL), accidentally committed secrets (TruffleHog), and third-party dependency vulnerabilities (Trivy). Security scanning in CI catches vulnerabilities before they reach production and covers the critical attack surface.
Step 4: Build and push a Docker image
For containerised applications, add a job that builds and pushes your Docker image after tests and security scanning pass:
  build-image:
    name: Build Docker Image
    runs-on: ubuntu-latest
    needs: [test, security]
    permissions:
      contents: read
      packages: write   # Required for pushing to GitHub Container Registry

    steps:
      - name: Checkout code
        uses: actions/checkout@v4

      - name: Set up Docker Buildx
        uses: docker/setup-buildx-action@v3

      - name: Log in to GitHub Container Registry
        uses: docker/login-action@v3
        with:
          registry: ghcr.io
          username: ${{ github.actor }}
          password: ${{ secrets.GITHUB_TOKEN }}  # Automatic — no manual secret needed

      - name: Extract metadata for Docker
        id: meta
        uses: docker/metadata-action@v5
        with:
          images: ghcr.io/${{ github.repository }}
          tags: |
            type=sha,prefix=,suffix=,format=short
            type=ref,event=branch
            type=semver,pattern={{version}}

      - name: Build and push Docker image
        uses: docker/build-push-action@v5
        with:
          context: .
          push: true
          tags: ${{ steps.meta.outputs.tags }}
          labels: ${{ steps.meta.outputs.labels }}
          cache-from: type=gha      # Use GitHub Actions cache for Docker layers
          cache-to: type=gha,mode=max
The cache-from: type=gha and cache-to: type=gha,mode=max lines enable Docker layer caching through GitHub's built-in cache — this cuts Docker build time by 40–70% for subsequent runs on unchanged layers.
Step 5: Deploy to staging automatically
Once the image is built and pushed, deploy it to your staging environment automatically on every push to main:
  deploy-staging:
    name: Deploy to Staging
    runs-on: ubuntu-latest
    needs: build-image
    environment: staging    # Ties to a GitHub Environment with its own secrets and rules
    if: github.ref == 'refs/heads/main'   # Only on main branch, not PRs

    steps:
      - name: Deploy to staging
        run: |
          echo "Deploying ${{ github.sha }} to staging..."
          # Replace with your actual deployment command:

          # For AWS ECS:
          # aws ecs update-service --cluster staging --service my-app \
          #   --force-new-deployment

          # For Kubernetes:
          # kubectl set image deployment/my-app \
          #   my-app=ghcr.io/${{ github.repository }}:${{ github.sha }}

          # For a VPS with Docker Compose:
          # ssh deploy@staging.example.com "docker pull ghcr.io/${{ github.repository }}:${{ github.sha }} && docker-compose up -d"

      - name: Run smoke tests against staging
        run: |
          sleep 30   # Wait for deployment to complete
          curl --fail https://staging.yourapp.com/health || exit 1
GitHub Environments are worth understanding here. By declaring environment: staging, you:
- Tie specific secrets to the staging environment (staging API keys, database URLs)
- Get a deployment history and rollback capability in the GitHub UI
- Can add protection rules — required reviewers, wait timers, branch restrictions
Step 6: Gate production releases with manual approval
Automatic deployment to staging is safe. Automatic deployment to production is a decision that depends on your testing confidence and risk tolerance. For most teams, a human approval gate on production is the right default.
  deploy-production:
    name: Deploy to Production
    runs-on: ubuntu-latest
    needs: deploy-staging
    environment: production   # GitHub will require approval from designated reviewers
    if: github.ref == 'refs/heads/main'

    steps:
      - name: Deploy to production
        run: |
          echo "Deploying ${{ github.sha }} to production..."
          # Your production deployment command here

      - name: Notify team on successful deployment
        uses: slackapi/slack-github-action@v1.26.0
        with:
          payload: |
            {
              "text": "✅ Deployed ${{ github.sha }} to production successfully"
            }
        env:
          SLACK_WEBHOOK_URL: ${{ secrets.SLACK_WEBHOOK_URL }}
To configure the approval gate: go to Settings → Environments → production → Required reviewers. Add the people who can approve production deployments. When this job is reached, GitHub pauses and sends a notification — the pipeline only continues once an approver clicks "Approve and deploy."
Step 7: The complete production-ready pipeline
Here's the full workflow combining everything above — a pipeline you can adapt to your stack:
name: Full CI/CD Pipeline

on:
  push:
    branches: [main, develop]
  pull_request:
    branches: [main]

concurrency:
  group: ${{ github.workflow }}-${{ github.ref }}
  cancel-in-progress: true   # Cancel redundant runs when new commits are pushed

env:
  NODE_VERSION: '20'

jobs:
  # ─── Stage 1: Quality gates (run in parallel) ───────────────────
  lint:
    name: Lint & Type Check
    runs-on: ubuntu-latest
    steps:
      - uses: actions/checkout@v4
      - uses: actions/setup-node@v4
        with:
          node-version: ${{ env.NODE_VERSION }}
          cache: npm
      - run: npm ci
      - run: npm run lint
      - run: npm run type-check

  test:
    name: Tests
    runs-on: ubuntu-latest
    steps:
      - uses: actions/checkout@v4
      - uses: actions/setup-node@v4
        with:
          node-version: ${{ env.NODE_VERSION }}
          cache: npm
      - run: npm ci
      - run: npm test -- --coverage

  security:
    name: Security Scan
    runs-on: ubuntu-latest
    permissions:
      security-events: write
    steps:
      - uses: actions/checkout@v4
      - name: Scan for secrets
        uses: trufflesecurity/trufflehog@main
        with:
          extra_args: --only-verified --fail
      - name: Run Trivy
        uses: aquasecurity/trivy-action@master
        with:
          scan-type: fs
          severity: CRITICAL,HIGH
          exit-code: 1

  # ─── Stage 2: Build (after all quality gates pass) ──────────────
  build-image:
    name: Build Docker Image
    runs-on: ubuntu-latest
    needs: [lint, test, security]
    permissions:
      contents: read
      packages: write
    steps:
      - uses: actions/checkout@v4
      - uses: docker/setup-buildx-action@v3
      - uses: docker/login-action@v3
        with:
          registry: ghcr.io
          username: ${{ github.actor }}
          password: ${{ secrets.GITHUB_TOKEN }}
      - name: Build and push
        uses: docker/build-push-action@v5
        with:
          context: .
          push: ${{ github.ref == 'refs/heads/main' }}
          tags: ghcr.io/${{ github.repository }}:${{ github.sha }}
          cache-from: type=gha
          cache-to: type=gha,mode=max

  # ─── Stage 3: Deploy staging (main branch only) ─────────────────
  deploy-staging:
    name: Deploy to Staging
    runs-on: ubuntu-latest
    needs: build-image
    environment: staging
    if: github.ref == 'refs/heads/main'
    steps:
      - name: Deploy
        run: echo "Deploy to staging..."
      - name: Smoke test
        run: curl --fail https://staging.yourapp.com/health

  # ─── Stage 4: Deploy production (manual approval required) ──────
  deploy-production:
    name: Deploy to Production
    runs-on: ubuntu-latest
    needs: deploy-staging
    environment: production
    if: github.ref == 'refs/heads/main'
    steps:
      - name: Deploy
        run: echo "Deploy to production..."
Managing secrets securely
Never hardcode credentials in workflow files. GitHub provides encrypted secret storage at three levels:
Repository secrets — available to all workflows in the repo. Go to Settings → Secrets and variables → Actions → New repository secret.
Environment secrets — scoped to a specific environment (staging, production). Prevents staging credentials from being accessible to production jobs.
Organisation secrets — shared across multiple repositories in your organisation. Useful for shared infrastructure credentials.
Reference secrets in workflows like this:
env:
  DATABASE_URL: ${{ secrets.DATABASE_URL }}
  API_KEY: ${{ secrets.API_KEY }}
For cloud provider authentication, use OIDC (OpenID Connect) instead of long-lived access key secrets wherever possible. OIDC lets your workflow request short-lived tokens from AWS, GCP, or Azure without storing static credentials — significantly reducing the blast radius of a compromised workflow.
# AWS OIDC authentication (no static AWS_ACCESS_KEY_ID needed)
- name: Configure AWS credentials
  uses: aws-actions/configure-aws-credentials@v4
  with:
    role-to-assume: arn:aws:iam::123456789:role/github-actions-role
    aws-region: us-east-1
Optimising pipeline performance
A pipeline that takes 20 minutes will be worked around. Target under 10 minutes for the CI portion and under 5 minutes for fast feedback on pull requests.
Run jobs in parallel wherever possible. Lint, test, and security can all run simultaneously. The pipeline finishes when the slowest job finishes — not when all jobs finish sequentially.
Use concurrency: to cancel redundant runs. When a developer pushes three commits in quick succession, the first two pipeline runs are immediately obsolete. Cancel them:
concurrency:
  group: ${{ github.workflow }}-${{ github.ref }}
  cancel-in-progress: true
Use paths: filters to skip unnecessary runs. If only documentation changed, you don't need to rebuild your Docker image:
on:
  push:
    paths:
      - 'src/**'
      - 'package.json'
      - 'Dockerfile'
    paths-ignore:
      - '**.md'
      - 'docs/**'
Use matrix builds for multi-version testing. Test against multiple Node.js versions without duplicating workflow code:
strategy:
  matrix:
    node-version: [18, 20, 22]
steps:
  - uses: actions/setup-node@v4
    with:
      node-version: ${{ matrix.node-version }}
Add timeout-minutes: to every job. A hung test suite or a network hang during deployment shouldn't run for six hours and drain your Actions minutes.
Common mistakes and how to avoid them
Using @latest or @main for action references. These tags are mutable — a compromised upstream action can execute arbitrary code in your pipeline. Pin to a specific SHA or version tag:
# ❌ Unsafe — tag can be moved to point at malicious code
uses: actions/checkout@main

# ✅ Safe — SHA cannot be changed without updating your workflow
uses: actions/checkout@v4
# Or pinned to exact SHA for maximum security:
uses: actions/checkout@11bd71901bbe5b1630ceea73d27597364c9af683
Storing sensitive values as environment variables at the workflow level. Workflow-level env vars are available to all jobs, including ones that shouldn't have access. Scope secrets to the job or step level.
Not setting timeout-minutes. Without a timeout, a hung job will run until GitHub's maximum limit (6 hours for public repos) — wasting minutes and blocking your pipeline.
Checking in .github/workflows/ files without testing them. Workflow files are not validated until they run. Use actionlint locally to catch syntax and logic errors before pushing:
brew install actionlint
actionlint .github/workflows/*.yml
Skipping the staging step and deploying directly to production. Always have at least one non-production environment where the deployment process runs first. If your deployment script has a bug, you want to discover it on staging, not production.
A realistic rollout plan for new teams
Week 1 — CI foundation: Add the basic workflow with checkout, install, lint, and test. Get every developer seeing automated feedback on their pull requests. This alone changes team behaviour.
Week 2 — Security baseline: Add secret scanning and dependency vulnerability scanning. Review and triage any findings from the first scan — there will likely be a backlog.
Week 3 — Docker build and registry: Add the Docker build and push job. Establish your image tagging convention (SHA-based tags are the most reliable for traceability).
Week 4 — Staging deployment: Add the staging deploy job. Wire it to your staging environment. Run your smoke tests. Make sure the pipeline can deploy a real change end to end.
Month 2 — Production gate: Add the production deployment job with manual approval. At this point, your pipeline is fully operational.
Ongoing: Add caching optimisations, matrix builds, parallelisation, and advanced deployment strategies (canary, blue-green) as your confidence and complexity grow.
Frequently asked questions
How much does GitHub Actions cost? GitHub Actions is free for public repositories with no limits. For private repositories, every account includes a free tier: 2,000 minutes per month on the free plan, 3,000 on Pro, and 50,000 on Enterprise. Standard Linux runners consume minutes at 1:1. macOS runners consume at 10:1. Most small to mid-size teams don't exceed their free quota.
How is GitHub Actions different from Jenkins? Jenkins is a self-hosted CI/CD tool that requires you to provision, maintain, patch, and scale your own infrastructure. GitHub Actions is fully managed — GitHub handles the runners, you write YAML files. Most Jenkins pipelines migrate with 70–90% accuracy; the remaining complexity usually involves custom Jenkins plugins that need to be replaced with marketplace Actions or shell scripts.
Can I use GitHub Actions for any programming language? Yes. GitHub Actions is platform agnostic, language agnostic, and cloud agnostic — you can use it with whatever technology you choose. The marketplace has setup actions for Node.js, Python, Go, Java, Ruby, Rust, .NET, PHP, and virtually every other mainstream language.
What are GitHub Environments? GitHub Environments are named deployment targets (staging, production) with their own secrets, protection rules, and deployment history. You can require manual approvals before a job targeting an environment runs, restrict which branches can deploy to an environment, and add wait timers. They're the primary mechanism for gating production deployments.
How do I run GitHub Actions on my own infrastructure? Self-hosted runners let you run workflows on your own machines — useful when you need access to private network resources, specific hardware, or want to avoid minute consumption. Register a self-hosted runner under Settings → Actions → Runners. For Kubernetes environments, the Actions Runner Controller (ARC) manages ephemeral, auto-scaling runners automatically.
What is OIDC and why should I use it instead of storing AWS/GCP credentials?
OIDC (OpenID Connect) allows your GitHub Actions workflow to request short-lived credentials from a cloud provider without storing static access keys. Instead of a long-lived AWS_ACCESS_KEY_ID sitting in your secrets, your workflow requests a temporary token valid for the duration of the job. If the token is ever exposed, it expires on its own. It's the current security best practice for cloud provider authentication in CI/CD.
What is concurrency: and when should I use it?
The concurrency: key lets you cancel in-progress pipeline runs when a new one starts for the same branch. It prevents a backlog of outdated pipeline runs from consuming runner resources and confusing developers with stale results. Add it to any workflow that runs on pull requests — it's a quick win for pipeline efficiency.

Iria Fredrick Victor
Iria Fredrick Victor(aka Fredsazy) is a software developer, DevOps engineer, and entrepreneur. He writes about technology and business—drawing from his experience building systems, managing infrastructure, and shipping products. His work is guided by one question: "What actually works?" Instead of recycling news, Fredsazy tests tools, analyzes research, runs experiments, and shares the results—including the failures. His readers get actionable frameworks backed by real engineering experience, not theory.
Share this article:
Related posts
More from Devops
May 27, 2026
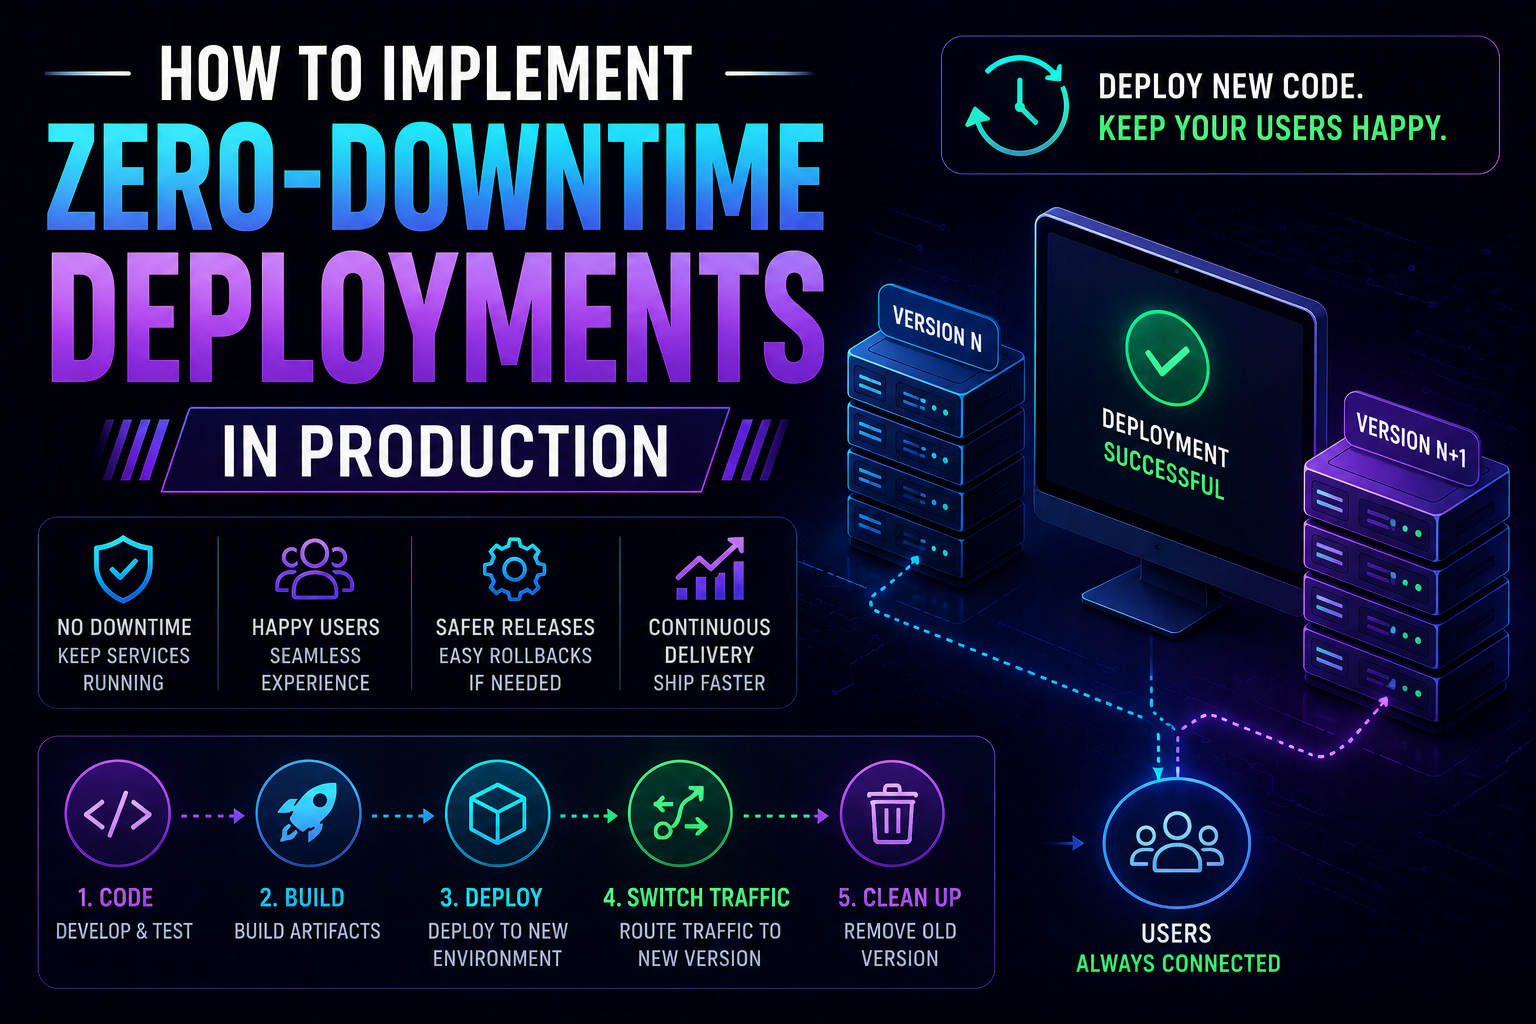
117Learn how to implement zero-downtime deployments in production — covering rolling updates, blue-green deployments, canary releases, feature flags, database migration patterns, graceful shutdown, and automated rollback with real Kubernetes YAML and code examples.
May 13, 2026
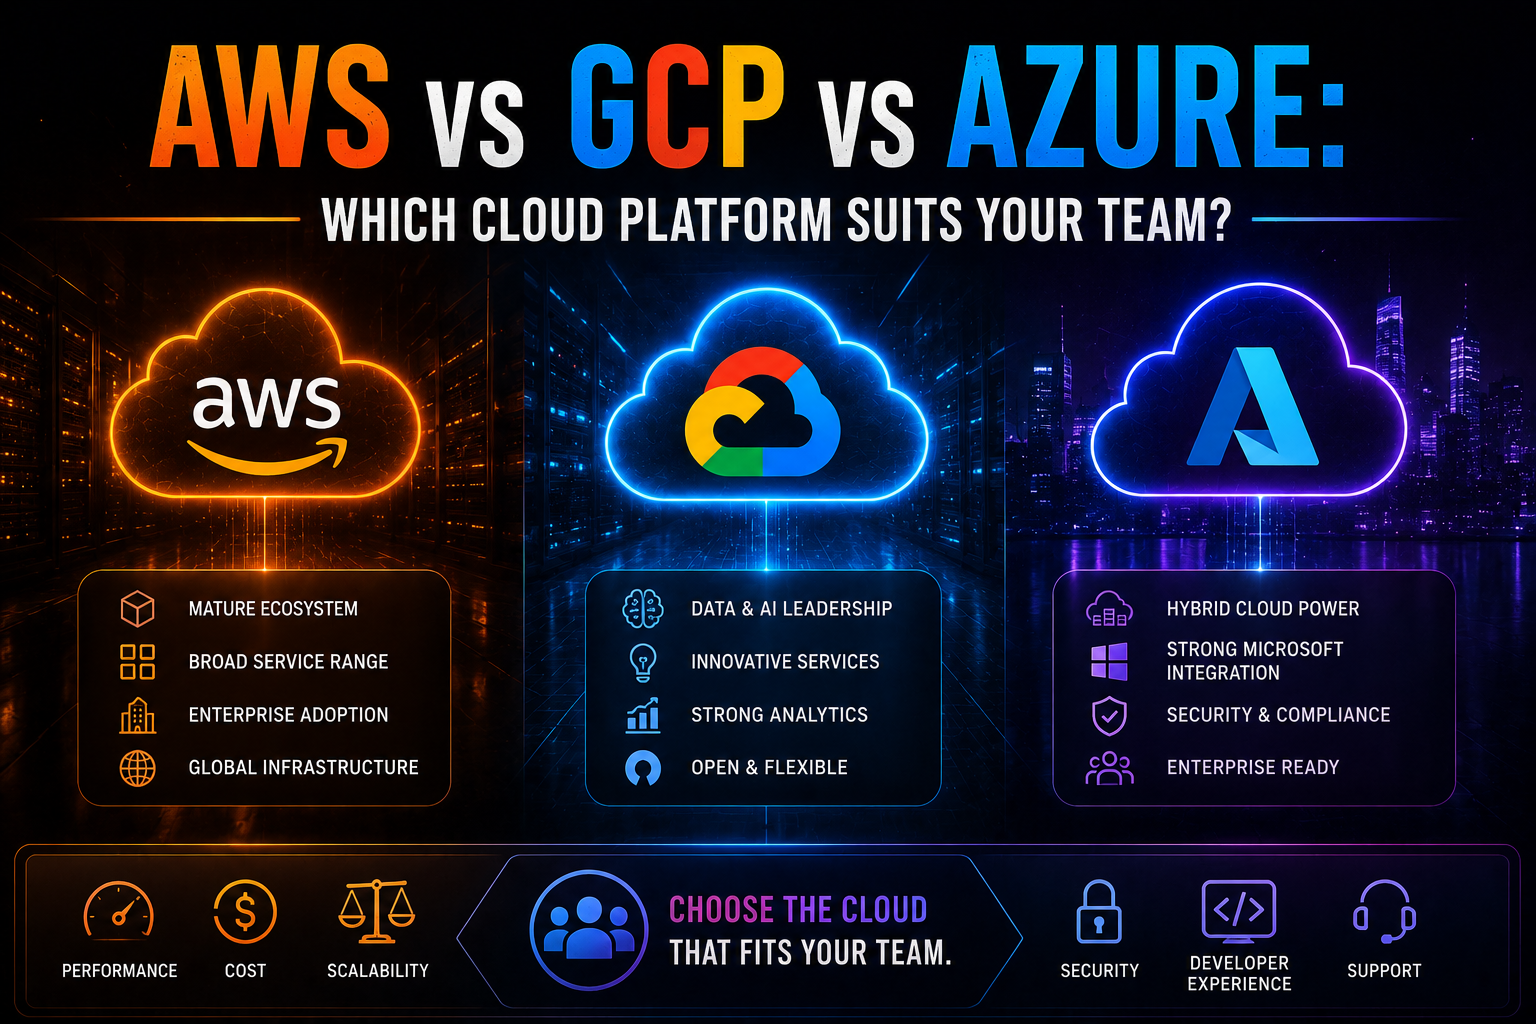
781AWS vs Azure vs GCP in 2026 — an honest, vendor-neutral comparison covering market share, AI/ML tooling, pricing, Kubernetes, compliance, and which cloud platform suits your team's specific workload and ecosystem.
May 13, 2026
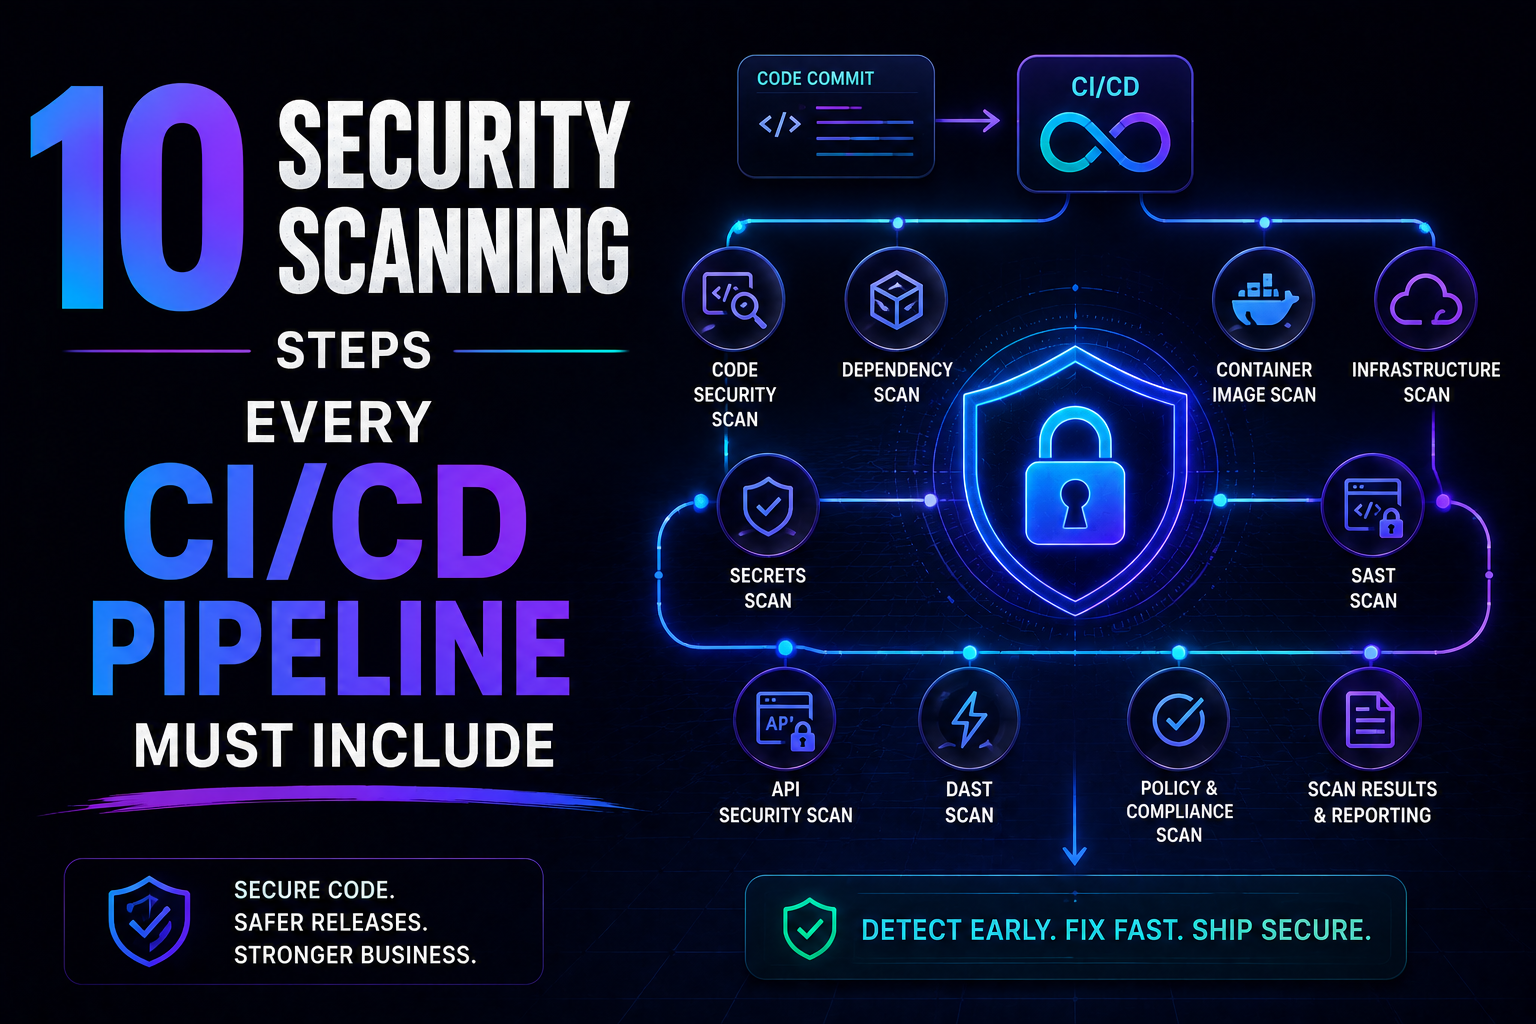
85SAST, SCA, container scanning, DAST, runtime verification – 10 security steps every CI/CD pipeline needs in 2026. Open source tools, real examples, and a rollout timeline. Stop shipping vulnerabilities.